

Key Takeaways
- Mobile app development is the process of planning, designing, building, and maintaining an application for iOS or Android; this page walks through how that process runs stage by stage.
- The mobile app development process runs in seven stages, starting with research and ending with maintenance after the launch. Each stage produces a deliverable, and the client approves it before the next stage opens.
- Every stage has a specialist who runs it. A business analyst owns the requirements, a designer owns the screens, developers write the build, and a QA engineer runs the test plan.
- Approvals stay on the client side, and three roles cover all seven of them: business sponsor, technical contact, plus a brand and content owner.
- Four client inputs decide whether a stage starts on time, covering decision-maker availability, brand assets, credentials for third-party systems, and people for user acceptance testing.
- A few stages overlap in practice. Backend work starts while the screens are in design, test cases are written while modules are being coded, and developer accounts are requested during development.
- After the launch, the work moves to a retainer, covering the minimum supported version check, feature flags, and crash reports grouped by device model. The code, along with the store accounts, stays in the client’s name.
An app build brings in a different specialist at each stage. The mobile app development process gives every stage an owner, along with the output that owner is accountable for.
A business analyst owns the requirements, and a designer owns the screens. App developers write the build against both. A QA engineer runs it through the test plan. Knowing which specialist holds a stage tells a client who to ask for an update on it.
This blog sets out the seven mobile application development stages, with the specialist who runs each one and the output it produces.
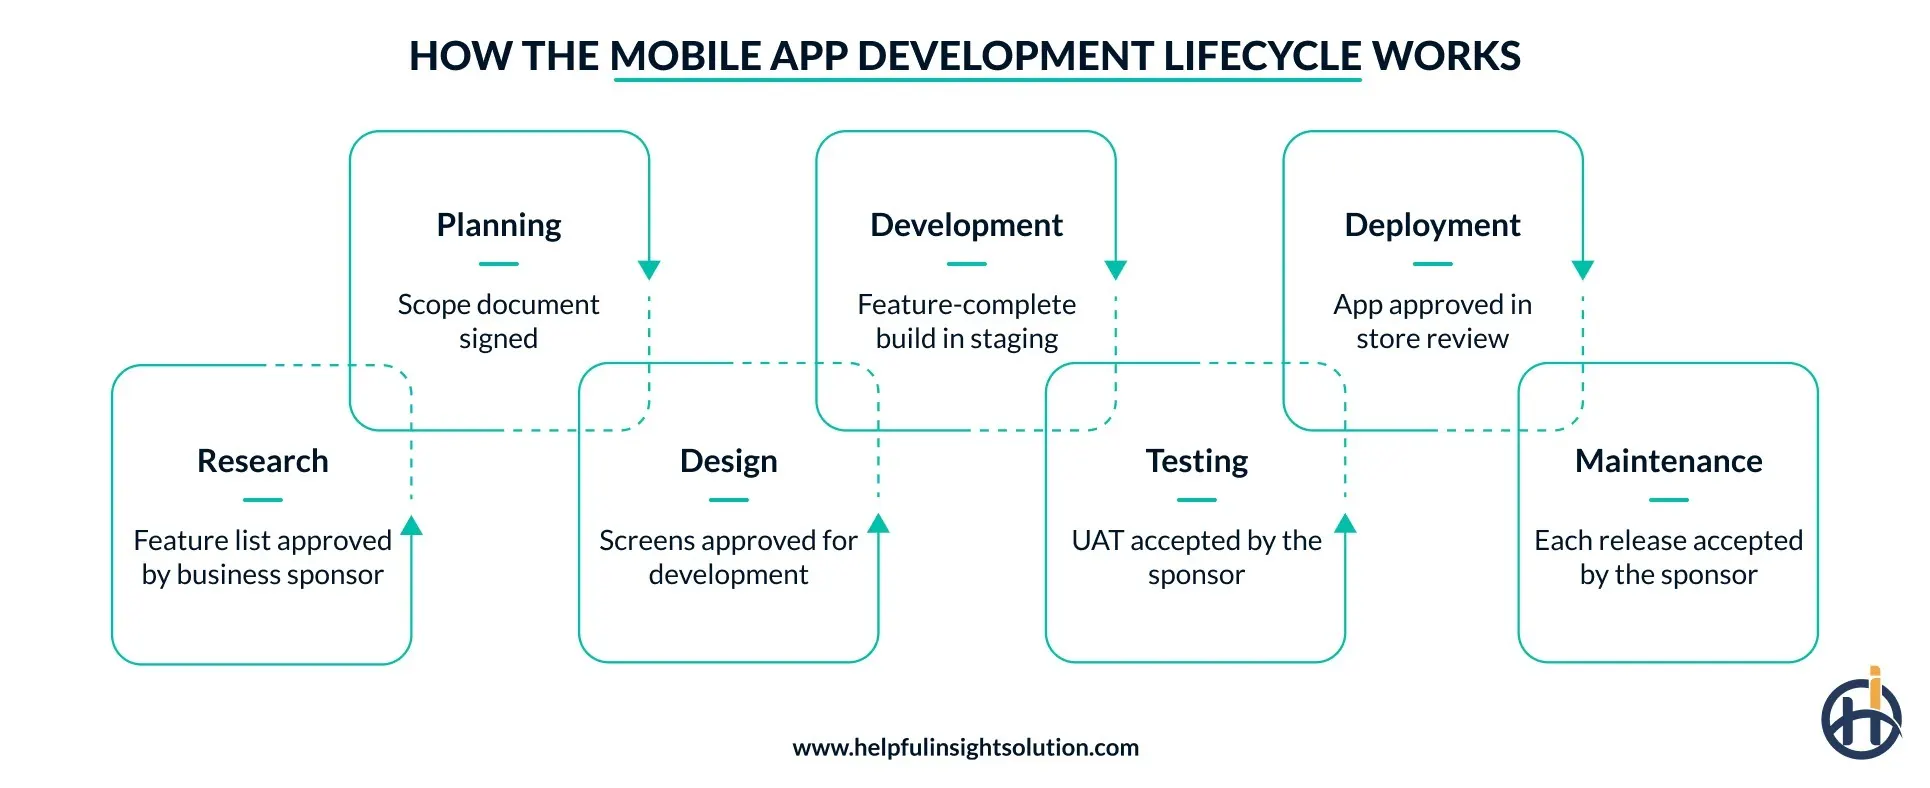
How the Mobile App Development Lifecycle Works
The mobile app development lifecycle works as a sequence of seven stages. For a full breakdown of what mobile app development involves and the different app types, see our [mobile app development guide].
Every mobile app development engagement follows this same structure, whether the build is a simple utility or an enterprise mobile app development process with multiple integrations.
Each stage takes an input from the client and produces a deliverable at the end of it, which becomes the material the next stage works on.
The Stages of Developing an App and What Each One Produces
The table below covers all seven stages, including what the client provides at each one and the approval needed to close it.
| Stage | Client input needed | Deliverable produced | Output |
| Research | Business goals, competitor research, access to existing users | Feature list and market summary | Feature list approved by the business sponsor |
| Planning | Budget confirmation, platform preference, timeline constraints | Scope document, tech stack, project plan | Scope document signed |
| Design | Brand assets, product content, feedback within agreed rounds | Wireframes, clickable prototype, high-fidelity screens | Screens approved for development |
| Development | API access, credentials for third-party tools, answers on open items | Working build, delivered module by module | Feature-complete build in staging |
| Testing | Agreed device list, people for user acceptance testing | Test report and closed defect list | UAT accepted by the sponsor |
| Deployment | Developer account access, store listing copy, privacy policy | Live app on the App Store and Google Play | App approved in store review |
| Maintenance | Release priorities, support contacts | Release notes and patched versions | Each release accepted by the sponsor |
Who Approves the Work on the Client Side
Running the stages is the responsibility of the mobile app development partner, while the approvals remain with the client. Three roles cover all seven of them for the length of the project.
- Business sponsor: Responsible for approving the scope document, the budget, and every release that goes out after the launch.
- Technical contact: Provides API access along with credentials for third-party tools, and answers questions about the systems already running in the company.
- Brand and content contact: Provides the logo files, product content, and the text used in the store listing.
Assign these roles before the research phase begins to ensure every stage has a person who can approve it.
Mobile Application Development Stages
The mobile app development process has the following 7 stages. Each stage produces an output that is approved by the client and lays the foundation for the next step.
Stage 1: Ideation and Research
Defining the Purpose and Goals
Ideation and research is the first stage that sets the foundation for the whole app development process. It focuses on stating the problems the app will solve, the value it delivers to the user, and the business goals it supports.
Market Research and Competitor Analysis
Market research helps the client and mobile app development company to understand current trends, user preferences, and potential gaps in the market. Competitor analysis identifies the features existing competitors offer and where the gap exists.
The app categories already serving that audience set the baseline a new app is compared against.
Identifying the Target Audience
The target audience is important for deciding the app’s features, design, and the platform the app launches on. Document demographics, behaviours, and device preferences to create a user-centric app.
Research ends with a feature list and a market summary, both approved by the business sponsor before planning begins. These are the first steps in developing a mobile app, and the rest of the process builds on them.
Stage 2: Conceptualization and Planning
Wireframing and Prototyping
Wireframes and prototypes allow teams to visualize the app’s layout before development begins. It should be an iterative process that identifies potential usability issues early on, ensuring higher user adoption.
Technology Stack Selection
Technology stack covers programming languages, frameworks, and databases the app runs on. Mobile app developers must consider platform compatibility, third-party integrations, frameworks, scalability, and future growth. The frontend, backend, database, and cloud layers are decided together, because a change in one of them affects the others.
Project Timeline and Budget Allocation
Establishing a realistic timeline and budget is important for keeping the project on track. This stage involves estimating costs for development, design, testing, and marketing while setting milestones to monitor progress.
A well-defined timeline and budget keep the project organized while mitigating potential risks, so the app is delivered on schedule. Detailed cost tiers by app complexity are set out in the app development cost guide. The scope document written at this stage will be signed by the business sponsor.
Stage 3: Design
Crafting an Intuitive UI/UX Design
An intuitive user interface (UI) and user experience (UX) are the first thing users experience about an application. It must be visually appealing, enabling users to navigate easily through the app.
Ensuring Accessibility and Aesthetic Appeal
An app has to work for every user, including people with visual or motor impairments. Three checks handle most of it:
- Contrast: Text stays readable against its background at the ratios WCAG sets out.
- Screen readers: Interface elements carry labels a screen reader can announce correctly.
- Tap targets: Buttons and controls are sized so a user with limited motor control can hit them reliably.
Tools and Techniques for App Design
Design work runs through a few standard tools: Figma for collaborative screen design and prototyping, Sketch for interface work on Mac, and Adobe XD for handoff-ready mockups. Need a Figma designer for your project? Our team handles this stage end-to-end. The tool matters less than the review cycle: each screen goes through a client round before it’s marked ready for development.
The app design process steps are covered in detail further down this page. Design closes with the screens approved by the client, and brand assets along with product content are the inputs the stage waits on.
Stage 4: Development
Frontend and Backend Development Processes
Development involves coding both the frontend (user interface) and backend (server-side logic) components of the app. The frontend technologies used here decide how the app looks and responds, while the backend handles the logic running behind it. Collaboration between frontend and backend developers is needed to integrate all features.
Choosing Between Native, Cross-Platform, or Hybrid
Deciding whether to develop a native app (specific to one platform), a cross-platform app (compatible with multiple platforms), or a hybrid app (a combination of both) impacts performance, user experience, and development time. Native, cross-platform, and hybrid builds are compared in the mobile app development guide.
Integration of Features and APIs
Payment gateways, social logins, maps, and analytics are connected to the application through APIs. Credentials for each third-party integration come from the client, and the integration work waits until they are shared. The stage closes on a feature-complete build running in a staging environment.
Stage 5: Testing and Quality Assurance
Importance of Bug Identification and Resolution
Testing helps the development team to identify bugs or issues before the launch. The app should be tested across various devices and operating systems to ensure compatibility. Regular testing helps ensure that all features work as intended, maintaining the app’s integrity and reliability.
Manual and Automated Testing Techniques
Employing both manual testing (human testers evaluate usability) and automated testing (software tools run tests) helps ensure comprehensive coverage of all aspects of the application.
- Manual Testing: This involves human testers who explore the app’s functionalities, looking for bugs and usability issues based on their experiences.
- Automated Testing: The method is particularly effective for regression testing, where previously tested functionalities are re-evaluated after updates or bug fixes.
Ensuring Scalability and Performance
Testing should also focus on scalability to ensure the app can handle increased loads. Performance metrics like speed and responsiveness are measured under various conditions. Load testing shows how the app performs under stress, which identifies bottlenecks before they affect real users.
Testing produces a test report along with a closed defect list, and user acceptance testing is accepted by the business sponsor.
Stage 6: Deployment and Launch
Publishing the App on App Stores
Once development and testing are complete, the app is ready for deployment on the Google Play Store and the Apple App Store. The process involves packaging the app according to each platform’s specific submission guidelines.
Developer account access comes from the client because the accounts stay in the company’s name.
Setting Up Distribution Channels
After the app is ready for release, establishing effective distribution channels becomes important for its success. The channels include marketing strategies such as social media campaigns, influencer collaborations, email marketing, and paid advertising.
Store optimization, including work on the title, keywords, and screenshots, is covered in the mobile app development guide.
Handling App Store Guidelines and Approvals
App Store guidelines can be intricate, requiring attention to detail to ensure a smooth approval process. Developers must ensure that their apps comply with platform-specific policies regarding security, privacy, content, and functionality. Any violations or non-compliance could lead to delays or rejection.
A phased release sends the first version to a share of users, and that share is increased once the crash reports come back clean.
Stage 7: Maintenance and Updates
The maintenance phase keeps the app functional, relevant, and user-friendly long after its initial launch. The stage involves several activities that contribute to the app’s long-term success.
- Monitoring User Feedback and Performance Metrics: Post-launch monitoring of user feedback is important for understanding how well the app meets user needs. Analyzing performance metrics helps identify areas for improvement.
- Regular Updates and Feature Enhancements: To keep users engaged long-term, regular updates that address bugs or introduce new features are necessary. Ongoing support helps maintain user satisfaction.
- Long-Term Scalability and Support: Planning for long-term scalability ensures the app can grow alongside the business needs. Providing continuous support keeps the app working for users on older versions.
Releases go out on a calendar agreed with the client, and each one is accepted by the business sponsor before it is published.
Mobile Application Development Stages That Run Alongside Each Other
The mobile application development stages are listed in order, but a few of them overlap in practice. Some tracks are started early because the work that follows is dependent on them.
Backend Work Starts During Design
The backend can be started while the screens are still in design. Database structure, API endpoints, and server setup are planned from the approved feature list. Backend developers use this period for that work. The API is then available when the frontend team receives the approved screens.
Test Planning Starts During Development
Test cases are written from the requirement document, so the QA team is able to prepare them while the modules are being coded. Device selection is handled in the same period. Testing then starts on the first completed module.
Store Accounts and Credentials Are Set Up During Development
Developer accounts on Google Play and the Apple Developer Program involve a verification step, which takes time on the store side. Payment gateway approvals work in a similar way. Both are requested during development.
A parallel track removes the waiting period between two stages. The backend track removes the wait the frontend team would otherwise have for a working API.
What the Client Owes at Each Point in the App Development Process
The app development process needs input from the client side at fixed points. Four of them are worth planning for in advance.
| What the client provides | Needed during | Handled by |
| Decision maker availability | Research, planning, and every approval after that | Business sponsor |
| Content and brand assets | Design | Brand or marketing team |
| Credentials for third-party systems | Development | Technical contact or IT |
| People for user acceptance testing | Testing | The team that will use the app |
Decision-maker availability is the input needed most often. Approvals are required at the end of every stage, and each one is dependent on a person who is authorized to give it.
Content is the second one. Product descriptions, images, and legal text are prepared by the client’s own team. The design work uses them on the screens.
Credentials are requested during development. Verification on the store side is handled by the provider, so the request is made before the integration is scheduled.
User acceptance testing needs people from the team that will use the app. Their time for this is planned into the schedule along with their regular work.
Top Mobile App Development Lifecycle Models for 2026
To build a mobile application with a structured approach, different frameworks are used. They are known as the mobile app development lifecycle models, ensuring stages from ideation to app maintenance and beyond. In this section, we will discuss key models for the future:
1. Waterfall Model
The Waterfall model follows a linear and sequential approach where phases must be completed before moving forward. It is best suited for mobile apps with clearly defined requirements and minimal changes. However, its rigidity makes it less adaptable to evolving user needs.
Benefits:
- Simple and structured approach, ideal for projects with fixed requirements.
- Clear documentation at every stage ensures easy project tracking.
2. Agile Model
The Agile model emphasizes flexibility, continuous feedback, and incremental development. Mobile apps are built in short iterations, allowing teams to adapt to requirements quickly. This model is ideal for dynamic projects focused on user experience and rapid innovation.
Benefits:
- Enables rapid adaptation to changing user needs and market trends.
- Continuous feedback improves app quality and user satisfaction.
3. Scrum Model
Scrum is a framework within Agile that divides development into time-boxed sprints. It promotes collaboration through daily stand-ups, sprint reviews, and retrospectives. Scrum enables faster delivery and improved quality for complex mobile applications.
Benefits:
- Short sprints accelerate development and faster feature delivery.
- High team collaboration boosts productivity and accountability.
4. V-Shaped Model
This model is an extension of the Waterfall approach, emphasizing validation and verification at every stage. Each development phase has a corresponding testing phase, ensuring early defect detection. It is suitable for mobile apps requiring high reliability and compliance.
Benefits:
- Early testing at each stage reduces defects in later phases.
- Strong validation process ensures high-quality app development.
5. Iterative Model
The Iterative model develops mobile apps through repeated cycles, refining features with each iteration. Initial versions focus on core functionality, while enhancements are added progressively. This approach reduces risks and improves overall app quality over time.
Benefits:
- Allows gradual improvements through repeated development cycles.
- Early versions help identify risks and gather user feedback quickly.
6. Prototype Model
The Prototype model involves creating an early working version of the app to gather user feedback. This helps clarify requirements and improve usability before full development begins. It is especially useful for apps with complex interfaces or unclear user expectations.
Benefits:
- Visual prototypes help clarify requirements before full development.
- Reduces rework by validating design and functionality early.
7. Spiral Model
The Spiral model combines iterative development with risk analysis at every phase. Each loop focuses on planning, development, testing, and evaluation to minimize uncertainties. It is best suited for large-scale and high-risk mobile app projects.
Benefits:
- Effective risk management through continuous evaluation at each phase.
- Combines the flexibility of iteration with structured planning.
8. DevOps Model
The DevOps model integrates development and operations to enable continuous integration and deployment. It ensures faster releases, improved collaboration, and better app stability. DevOps is essential for scalable mobile apps with frequent updates in 2026. Integrating AI in DevOps can further streamline automation, testing, monitoring, and deployment workflows.
Benefits:
- Faster deployment with automated testing and continuous integration.
- Improved collaboration between development and operations teams.
9. Rapid Application Development (RAD) Model
RAD focuses on rapid prototyping and quick development using reusable components. It significantly reduces time-to-market while maintaining flexibility. This model works well for mobile apps with tight deadlines and evolving requirements.
Benefits:
- Accelerates app delivery using reusable components and tools.
- High user involvement ensures better alignment with business needs.
10. Big Bang Model
The Big Bang model involves minimal planning, with development starting based on available resources. It is suitable for small mobile app projects or experimental ideas with undefined requirements. However, it carries a high risk due to limited structure and predictability.
Benefits:
- Suitable for small projects with minimal planning requirements.
- Offers maximum flexibility when requirements are unclear or evolving.
The Release Cycle Continues After the App Goes Live
Releases continue after the launch. The work in this period is handled on a retainer, with a fixed set of activities in each cycle.
Minimum Supported Version and Force Update
Old versions of an app stay installed on handsets for a long time. A minimum supported version is set for this reason. The app checks that version at startup, and anything below it is asked to update before the app can be used. The check is added during development, since it cannot be added to a version already installed.
Feature Flags Remove the Store Review Wait
A feature flag is a switch on the server that turns a feature on or off in an app already installed. The feature is built into the release, and it stays off until the switch is changed. Changes of this type are not submitted for store review, so the release schedule is not dependent on review time.
Crash Triage and Store Review Response
Crash reports are grouped by device model and OS version. The grouping shows where a defect is limited to one handset type. Store reviews are answered in the same cycle, and the replies are visible on the listing to other users.
The release cycle, the response time for defects, and the number of releases in a year are the items covered in a maintenance agreement.
Move Your Build Through Every Stage With Helpful Insight
The stages of a mobile app build stay the same on every project. What changes is the discipline applied at each gate, along with the clarity of the deliverable that closes it. Helpful Insight has spent more than a decade on mobile and custom software development for clients. Explore our custom app development portfolio to see examples of our work.
Every project runs through the seven stages covered on this page. Design approvals, test reports, and release notes are shared as each stage closes, so the project status is available without a status call.
FAQs
Research is the first step. The problem the app solves, the users it is built for, and the competitor apps in the same category are studied here. The output is a feature list, and every stage after this builds on it.
The timeline to develop a mobile app takes 2 to 4 months for an MVP, 4 to 9 months for mid-level apps, and 9 to 12+ months for enterprise applications. The timeline depends on multiple factors such as platform selection, app complexity, UI/UX design, feature requirements, and third-party integrations. Here’s a detailed guide on the mobile app development timeline if you want to plan this out stage by stage.
The stages are the same. The same is true at the other end of the scale — an enterprise mobile app development process runs through these same seven stages, just with more integrations and a longer testing cycle per stage. The work inside each stage is smaller for an MVP, because an MVP covers one user journey on one platform. Research is still done in full, since the feature list decides what goes into the MVP and what is held back.
The change is estimated against the scope document, and the affected screens or modules are identified first. A change that affects an approved design goes back through the design stage before any code is written. When the current build is already in testing, changes of this type are handled in the next release.
The stages are the same in both cases. The development stage is where the difference is, because a native app has two codebases and a cross-platform app has one. Performance, hardware access, and maintenance effort are considered when choosing between native and cross-platform.
The client owns the code along with the developer accounts on both stores. Accounts are created in the company name at the deployment stage. Source code, with repository access, is handed over at the end of the project.
Research, planning, design, development, testing, deployment, and maintenance. Each stage produces a specific deliverable that the client approves before the next one opens, covered in full above.
Each stage in the table above works as one: the client input needed, the deliverable produced, and the approval that closes it. Running through those seven rows before kickoff catches most gaps before they cost time later.